
How to Set Up a Small DIY Workshop: Layout, Storage, Lighting, and Safety
A complete guide to setting up a small DIY workshop—layout, storage, lighting, workbench, dust control, and safety—so you can build projects in a space that actually works.
Disclosure: This post may contain affiliate links. If you purchase through one of these links, ProjectPerfectDIY may earn a commission at no additional cost to you.
You do not need a massive garage, a professional tool collection, or an unlimited budget to create a functional DIY workshop.
A corner of the garage, a small shed, part of a basement, or even a well-organized spare room can become a productive workspace with the right layout. The goal is not to squeeze in as many tools as possible. It is to create a space where you can work safely, find what you need, and complete projects without constantly moving piles of supplies out of the way.
A well-planned workshop makes every project easier. Your tools stay organized, cleanup takes less time, and you are far less likely to cover the living room in sawdust while assembling furniture.
This guide will walk you through how to set up a small DIY workshop using smart layout planning, vertical storage, proper lighting, flexible work surfaces, dust control, and essential safety equipment.
Welcome to Your Future DIY Command Center
Your future workshop might currently be a garage corner occupied by holiday decorations, half-empty paint cans, and several mystery boxes no one has opened in three years.
That is fine. Every functional workshop starts somewhere.
A dedicated work area gives your projects a consistent home. Instead of unpacking tools every time you want to make a repair or build something, you can walk into the space and get started.
Even a compact workshop can include:
- A sturdy workbench
- Organized hand-tool storage
- Portable power-tool storage
- Adequate lighting
- Dust collection
- Basic safety equipment
- Space for cutting, assembling, and finishing projects
The key is deciding how every part of the space will function before you start installing shelves or buying equipment.
Step 1: Assess Your Space and Plan the Layout
 Before buying storage systems or moving in your tools, take time to evaluate the space properly.
Grab a tape measure, notebook, and pencil. Record the dimensions of the room or workshop area and mark anything that could affect your layout.
Measure the Entire Space
Measure and note:
- Wall lengths
- Ceiling height
- Door locations and swing directions
- Window locations
- Electrical outlets
- Light fixtures
- Utility panels
- Water heaters or appliances
- Steps, posts, or permanent obstructions
Do not forget to account for the space needed to open cabinets, pull out drawers, move rolling carts, and feed long boards through tools.
Identify Your Project Workflow
Think about how materials will move through the workshop. A typical workflow might look like this:
- Bring materials into the shop.
- Measure and mark them.
- Cut or shape the pieces.
- Sand and prepare the surfaces.
- Assemble the project.
- Apply paint, stain, or finish.
- Store the completed project or move it outside.
Your layout should support that sequence as naturally as possible. Place your cutting area near a door if you regularly work with long boards. Keep your assembly surface in an open central area. Whenever possible, separate painting and finishing from dust-producing tools.
Sketch Several Layout Options
You do not need professional design software. Draw the basic shape of your space on paper and experiment with several arrangements. Include potential locations for:
- Workbench
- Miter saw or table saw
- Tool cabinets
- Wall-mounted storage
- Lumber storage
- Shop vacuum or dust collector
- Trash and scrap bins
- Finishing supplies
Trying several layouts on paper is much easier than moving a 200-pound workbench three times.
Prioritize Your Must-Haves
In a small workshop, every square foot needs a purpose. Separate your workshop features into three categories:
Essential
- Work surface
- Lighting
- Tool storage
- Electrical access
- Safety equipment
Useful
- Mobile assembly cart
- Dedicated miter-saw station
- Clamp rack
- Lumber storage
- Small finishing area
Future upgrades
- Large stationary tools
- Full dust-collection system
- Additional cabinets
- Specialty workstations
Build the workshop around the projects you actually plan to complete—not the imaginary cabinet shop you might own after winning the lottery.
Step 2: Use Smart Storage for Small Spaces
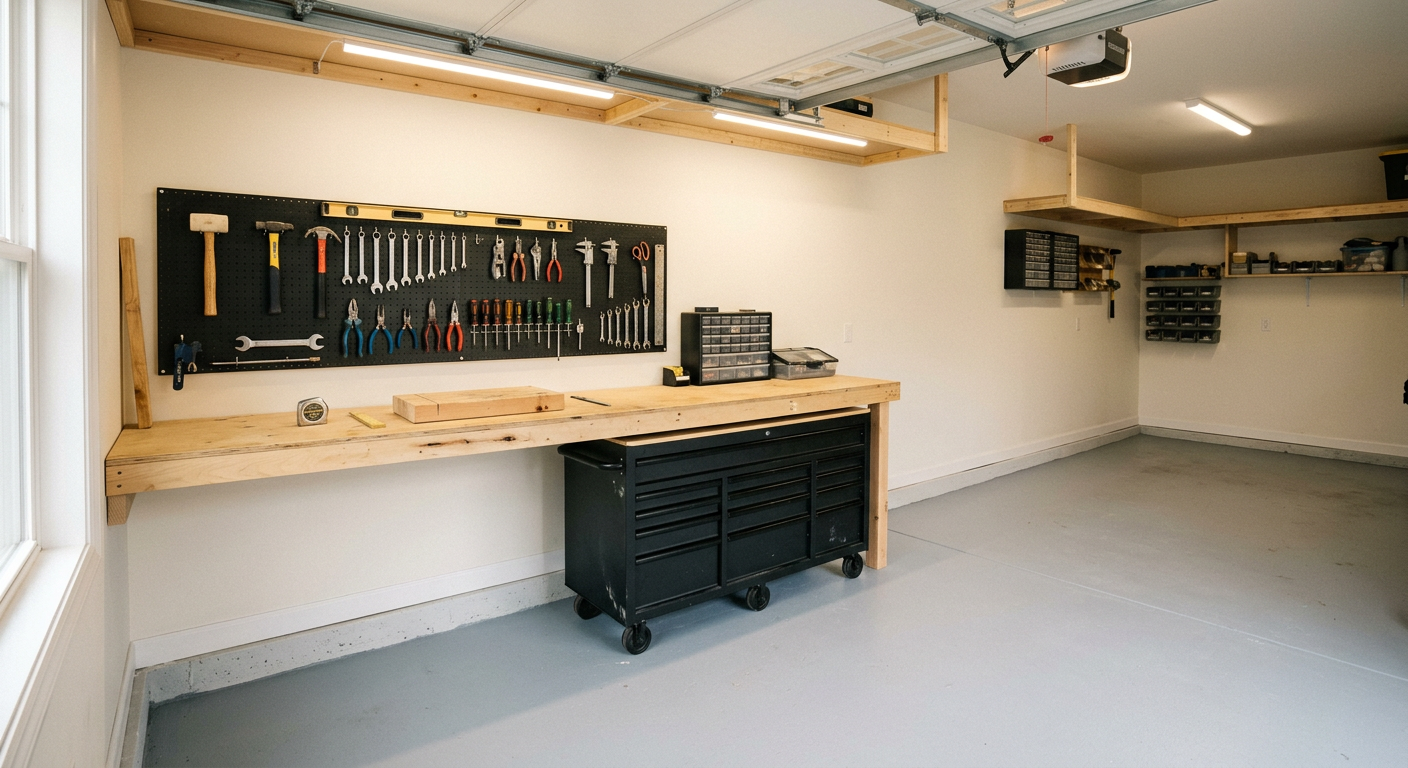
 The most valuable storage area in a small workshop is often not the floor. It is the wall. Vertical storage keeps tools visible, frees up your work surfaces, and prevents the workshop from becoming a maze of stacked plastic bins.
Install Wall-Mounted Storage
Common wall-storage options include:
- Pegboard
- French cleat systems
- Slatwall panels
- Open shelving
- Magnetic tool strips
- Wall-mounted cabinets
- Clamp racks
- Cord and hose hangers
Store frequently used tools between waist and eye level. Reserve high shelves for lightweight items, seasonal tools, and supplies you use less often.
Consider an Adjustable Wall System
Modular wall systems, such as Gladiator GearWall panels, allow you to move hooks, shelves, baskets, and tool holders as your needs change. These systems cost more than basic pegboard, but they can support heavier equipment and are easy to reconfigure.
⚠️ Affiliate placeholder — insert a modular wall-storage system, heavy-duty pegboard kit, or compatible accessory bundle.
Use Pegboard for Lightweight Tools
Pegboard is affordable, easy to install, and ideal for screwdrivers, pliers, wrenches, measuring tools, paintbrushes, craft supplies, and safety equipment. Choose sturdy hooks with locking clips whenever possible. Basic hooks have a remarkable talent for falling out precisely when you are trying to hang something.
Build a French Cleat System
A French cleat wall is one of the most customizable storage systems for a DIY workshop. It uses angled wooden strips that allow tool holders, shelves, and cabinets to be moved without permanently reinstalling them. You can build custom holders for drills, sanders, clamps, paint cans, batteries, small parts, and hand tools.
Organize Small Parts
Use clear drawers, divided cases, or labeled bins for screws, nails, bolts, washers, drill bits, sandpaper, picture-hanging hardware, and electrical connectors. Label containers by size, type, or purpose. "Random hardware" is not a category. It is where productivity goes to die.
Choose Mobile Storage
Rolling carts and mobile toolboxes are especially useful in compact workshops. A mobile station can serve as tool storage, an assembly table, a sanding station, a portable power-tool stand, an outfeed surface, or additional countertop space. Choose locking casters so the unit remains stable while you work.
Declutter Regularly
Small workshops become crowded quickly. Periodically review broken tools, duplicate supplies, dried paint, unusable scrap wood, and materials left over from projects you finished years ago. Keep genuinely useful items and remove the rest.
Step 3: Improve Your Workshop Lighting and Electrical Setup
 Good lighting is not a cosmetic upgrade. It directly affects safety, accuracy, and the quality of your work. Dim lighting makes measurements harder to read, hides surface defects, and creates shadows around blades and workpieces.
Start With Bright Overhead Lighting
LED shop lights are a practical choice because they are energy-efficient, long-lasting, and available in linkable configurations. For most workshops, look for lights with:
- A neutral or daylight color temperature
- Bright, even output
- A color rendering index of at least 80 (90+ for painting and finishing)
- Linkable or hardwired installation options
- Protective housings suitable for workshop use
Install multiple fixtures rather than relying on one bright light in the center of the room. This helps reduce shadows around your workbench and major tools.
⚠️ Affiliate placeholder — insert linkable LED shop lights suitable for garages, sheds, or basement workshops.
Add Task Lighting
Task lights provide concentrated illumination where detailed work happens. Useful options include an adjustable workbench lamp, under-shelf LED strips, magnetic machine lights, clamp-on lights, and portable rechargeable work lights. Place task lighting in front of or beside your work area so your body does not block the light.
Evaluate Your Electrical Capacity
Power tools can draw substantial electricity. Before setting up the workshop, identify which circuit supplies the area and what else is connected to it. Watch for warning signs such as tripped breakers, warm outlets, buzzing sounds, burning odors, flickering lights, damaged plugs, or loose receptacles. Stop using the affected outlet or circuit if you notice any of these issues.
Use Extension Cords Correctly
Extension cords should be a temporary solution, not permanent workshop wiring. When using one:
- Choose a heavy-duty cord rated for the tool''s amperage.
- Use outdoor-rated cords in damp or outdoor locations.
- Fully uncoil the cord before operating high-draw equipment.
- Keep cords out of walkways and cutting paths.
- Never run cords under rugs or through pinched doorways.
- Do not connect multiple extension cords or power strips together.
- Replace damaged cords immediately.
Areas exposed to moisture should have properly installed GFCI protection. For additional outlets, dedicated circuits, or questionable wiring, hire a licensed electrician. Electrical improvisation is one workshop project that should not begin with, "I saw a guy do this online."
Step 4: Choose the Right Workbench and Control Dust
 The workbench is the center of most DIY workshops. It provides a stable surface for measuring, cutting, drilling, sanding, assembling, clamping, and repairing.
What to Look for in a Workbench
A useful workbench should be stable, flat, comfortable to work at, large enough for your typical projects, small enough to fit the room, compatible with clamps, easy to clean, and capable of supporting your projects safely.
A mobile workbench is often the best option for a compact shop. It can be moved into the center of the room during a project and stored against a wall afterward. Look for heavy-duty locking casters. Wheels that do not lock securely can turn a routine sanding job into an unwanted tour of the garage.
⚠️ Affiliate placeholder — insert a sturdy mobile workbench with locking wheels, integrated storage, and a durable work surface.
Add Storage Beneath the Bench
Use the space below your workbench for power tools, tool cases, sandpaper, clamps, fasteners, scrap bins, and shop-vac attachments. Drawers keep smaller items clean and accessible. Open shelves work well for bulkier tools and cases.
Protect the Work Surface
Consider adding a replaceable MDF or plywood top over the main workbench surface. A sacrificial top can absorb drill holes, glue drips, paint, cutting marks, and general project abuse. When it becomes too damaged, replace it without rebuilding the entire bench.
Control Dust at the Source
Dust control is essential in a small workshop because particles accumulate quickly in enclosed spaces. Wood dust can irritate your eyes, skin, and respiratory system. Fine particles can remain airborne long after cutting or sanding ends.
Shop Vacuum — Works well for general cleanup, sanders, routers, jigsaws, circular saws, small miter saws, and workbench debris. Use the correct filter and collection bag for fine dust. Emptying a vacuum without a bag can release a lovely mushroom cloud of dust directly back into the workshop, defeating the entire point.
Dust Separator — A cyclone-style separator sits between the tool and shop vacuum. It captures larger debris before it reaches the vacuum filter, maintaining suction, reducing filter clogging, extending filter life, and making cleanup easier.
Dedicated Dust Collector — Stationary machines such as planers, jointers, cabinet saws, and larger sanders often require a dust collector that moves a greater volume of air than a standard shop vacuum. Choose equipment based on the tool manufacturer''s requirements and the size of your workspace.
Respiratory Protection — Dust collection does not capture every airborne particle. Wear properly fitted respiratory protection when cutting, routing, sanding, demolishing, or working with materials that produce fine dust.
Step 5: Make Workshop Safety a Priority
A productive workshop must also be a safe workshop. Safety equipment should be visible, accessible, and ready to use before you begin a project—not buried under three boxes and a folded camping chair.
Keep a Fire Extinguisher Near the Exit
Choose an extinguisher with an appropriate rating for your workshop. A multipurpose ABC-rated fire extinguisher is commonly used for ordinary combustibles, flammable liquids, and energized electrical equipment. Mount it along your exit route, in a visible location, away from the most likely source of a fire, and where it can be reached without moving through flames or smoke. Check the gauge and condition periodically.
Stock a First-Aid Kit
Your workshop first-aid kit should include adhesive bandages, sterile gauze, medical tape, antiseptic wipes, burn dressings, tweezers, disposable gloves, and eye-rinse solution. Keep emergency contact information available and make sure everyone who uses the workshop knows where the kit is stored.
Wear the Right Personal Protective Equipment
Depending on the project, workshop PPE can include safety glasses, sealed goggles, a face shield, hearing protection, a dust mask or respirator, chemical-resistant gloves, cut-resistant gloves, closed-toe shoes, and protective clothing.
Safety glasses should be worn whenever debris, chips, dust, or splashes could reach your eyes. Use hearing protection around loud tools including routers, saws, planers, and sanders. Do not wear loose gloves around rotating blades, drill presses, routers, lathes, or other machinery where fabric could become caught.
Follow Basic Tool-Safety Practices
Before using any tool:
- Read the manufacturer''s instructions.
- Inspect the cord, plug, guard, blade, and accessories.
- Secure the workpiece.
- Remove adjustment keys and wrenches.
- Keep hands away from cutting paths.
- Use push sticks or appropriate guides when required.
- Disconnect power before changing blades, bits, or accessories.
- Allow blades and bits to stop completely before setting tools down.
- Avoid working when tired, distracted, or impaired.
Sharp, properly maintained blades are generally safer than dull ones because they require less force and are less likely to bind.
Keep Walkways Clear
Clutter increases the risk of trips, falls, damaged tools, and accidental contact with sharp objects. At the end of each work session, return tools to storage, sweep or vacuum the floor, empty scrap bins, coil cords and hoses, wipe up spills, remove flammable waste, and clear all exits.
Store Chemicals Properly
Keep paints, stains, solvents, adhesives, and finishes in their original labeled containers, tightly closed, away from flames, sparks, heaters, and direct sunlight, out of reach of children and pets, and in accordance with the product label.
Oil-soaked rags can generate heat and ignite. Store and dispose of them using the product manufacturer''s instructions and local disposal requirements.
Provide Adequate Ventilation
Open doors and windows when conditions allow, and use ventilation appropriate for the product being applied. Do not assume an ordinary household fan is safe around flammable vapors. Review the product label and safety instructions before using paints, stains, epoxies, solvents, or spray finishes indoors.
Pro Tips for an Efficient Small Workshop
Label Everything
Label drawers, shelves, bins, tool cases, and small-parts organizers—wood screws, machine screws, drill bits, sandpaper grits, electrical supplies, painting supplies, safety equipment, measuring tools. Labels save time and make it easier to return tools to the correct location.
Choose Modular and Mobile Equipment
Whenever possible, select workstations and storage units that can be moved or reconfigured. A rolling cabinet can become an outfeed table. A folding stand can support a miter saw during a project and disappear afterward. A mobile workbench can serve as both an assembly table and a temporary finishing surface.
Use Overhead Space Carefully
Ceiling-mounted racks can store long or lightweight materials, but they must be installed securely and positioned so they do not create a head-strike hazard. Good candidates include lightweight trim, dowels, empty storage containers, seasonal supplies, and rarely used jigs. Avoid placing extremely heavy materials where they are difficult to retrieve safely.
Create a Five-Minute Reset Routine
At the end of each session, spend five minutes returning tools, clearing the workbench, vacuuming obvious dust, removing scraps, coiling cords, and preparing the space for the next step. A quick reset prevents a larger cleanup from becoming its own miserable weekend project.
Let the Layout Evolve
Your first layout will not be perfect. As you complete projects, pay attention to tools that are difficult to reach, areas that collect clutter, workstations that block walkways, lighting gaps, and frequently used supplies stored too far away. Adjust the space based on how you actually work.
Featured Workshop Tool: Kreg K5 Pocket-Hole Jig
🛠️ Kreg K5 Pocket-Hole Jig — a pocket-hole jig is useful for building furniture, cabinets, shelving, workbenches, and storage projects. It creates strong, concealed joints without requiring complicated traditional joinery.
⚠️ Affiliate placeholder — insert the Kreg K5 Pocket-Hole Jig affiliate product here.
Build Better Projects in a Better Space
Setting up a small DIY workshop does not have to be overwhelming or expensive. Start with the essentials:
- Measure the space.
- Plan your workflow.
- Add a sturdy work surface.
- Use vertical storage.
- Improve the lighting.
- Organize your electrical setup.
- Control dust.
- Install essential safety equipment.
You can add specialty tools and custom storage over time. The best workshop is not necessarily the largest or most expensive one. It is the workshop that helps you work safely, stay organized, and complete the projects you actually want to build.
Start with one clear surface, one dependable light, and one organized section of tools. Then improve the space one project at a time.
Frequently Asked Questions
How much space do I need for a DIY workshop?
You can create a functional workshop in a relatively small area. A 6-by-8-foot section of a garage, basement, or shed can provide enough room for a compact workbench, wall storage, and portable tools. The layout matters more than the total square footage. Use vertical storage and mobile equipment to preserve open floor space.
What should I buy first for a small workshop?
Start with a sturdy work surface, good lighting, basic safety equipment, and organized storage. These improvements support nearly every type of project and make the workshop safer before you begin adding more power tools.
Is pegboard or a French cleat system better?
Pegboard is usually faster and less expensive to install. It works well for lightweight hand tools and small supplies. A French cleat system supports heavier items and can be customized with movable shelves, cabinets, and tool holders. It requires more work to build but offers greater flexibility.
How should I control sawdust in a small workshop?
Start with a quality shop vacuum that can connect directly to your portable power tools. Add a dust separator if you regularly cut or sand wood. For larger stationary tools, consider a dedicated dust collector. Continue wearing suitable respiratory protection because no collection system captures every airborne particle.
Can I use extension cords permanently in my workshop?
No. Extension cords are intended for temporary use. For a permanent workshop setup, install an adequate number of correctly rated outlets and circuits. Consult a licensed electrician when additional wiring or electrical upgrades are necessary.
What lighting is best for a workshop?
LED shop lights provide efficient, bright overhead lighting. Combine them with adjustable task lighting above the workbench and detailed work areas. Choose fixtures that provide even illumination and accurate color rendering, especially if you paint, stain, or match finishes.
Tools & Supplies I Recommend
{{product:74bec1df-5a7e-405a-8e0c-1650d29c6d72|Top Pick}}
{{product:1b43d8bc-747f-4ecf-b7ed-4f05795fa722|Budget Pick}}
Final Thoughts
A small DIY workshop will continue to change as your projects, tools, and skills develop. You will reorganize shelves, build new storage, replace temporary work surfaces, and eventually wonder why you ever stored five different tools in one plastic tote labeled "garage stuff." That evolution is part of the process.
Focus first on creating a workspace that is safe, bright, organized, and comfortable to use. Once those fundamentals are in place, every future improvement becomes easier.
Share your workshop setup, space-saving ideas, or best organization tips in the comments. You can also tag ProjectPerfectDIY on social media so other DIYers can learn from your setup.
Happy building!
Related ProjectPerfectDIY Guides
- DIY French Cleat System: Build Custom Tool Storage
- Best Rolling Workbenches for Small Garage Workshops
- Essential Power Tools Every Beginner DIYer Needs